WELD-01 · Foundation · approximately 25–35 minutes including practice
Check the system before you weld.
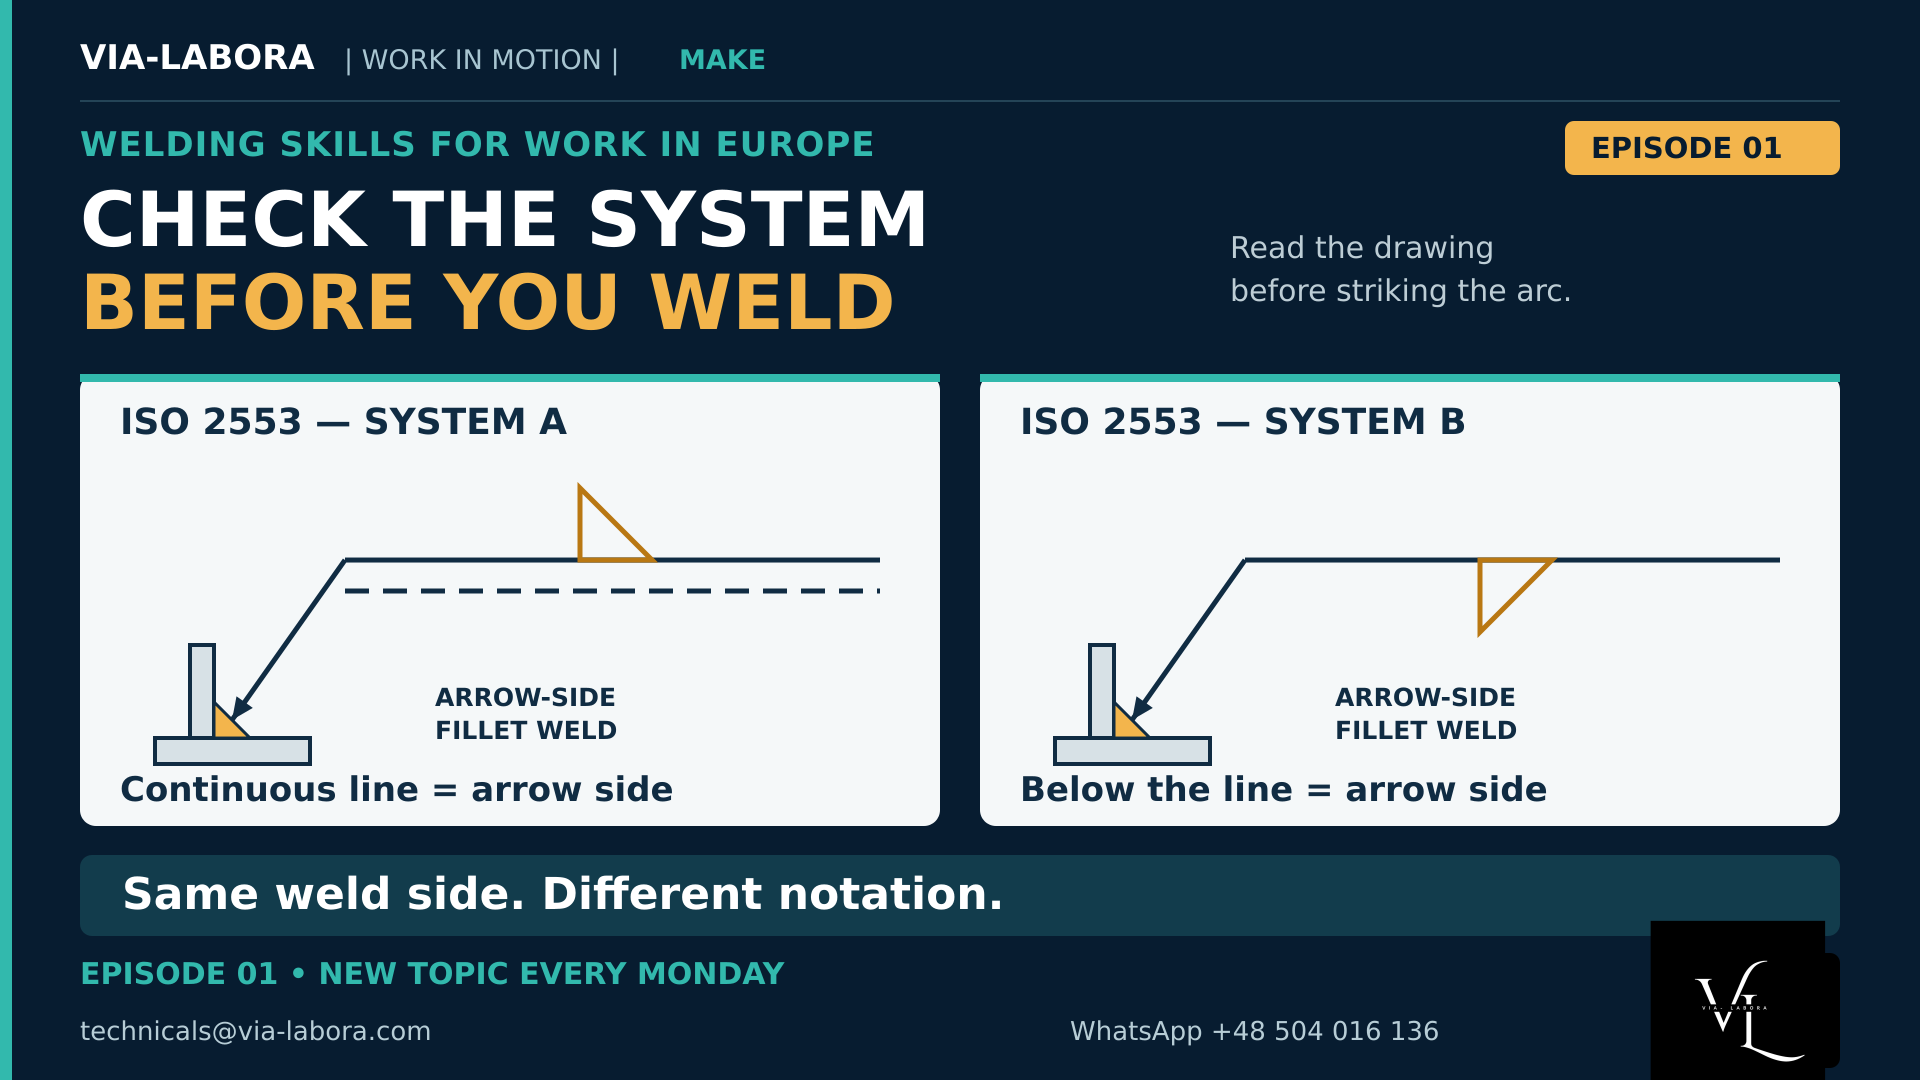
A familiar symbol can be misread when you apply the wrong convention. The original VIA-LABORA board below shows the same arrow-side fillet weld represented using two ISO systems.
This lesson explains that comparison, introduces the components of a complete welding designation and gives you a practical method for reviewing the surrounding documentation.
View the original infographic at full size (new tab)
Situation from work
You receive a drawing for a fabricated bracket. You recognise a triangular symbol and remember a similar component from a previous job.
Before preparing the parts, ask:
- Is this the appropriate drawing revision?
- Which joint does the designation identify?
- Which symbol system applies?
- Where are the remaining requirements stated?
Recognising one sign is useful. A reliable interpretation connects it with the complete instruction.
Who is this lesson for?
This introduction is for:
- Candidates beginning to read fabrication drawings.
- Welders moving between employers or customer documentation systems.
- Fabricators and fitters preparing welded assemblies.
- Team leaders discussing drawing-reading habits.
Experienced readers can use it to check assumptions. No prior symbol knowledge is required.
What will you gain?
You will gain a repeatable starting method, more precise clarification questions and a clearer way to describe your drawing competence.
Learning objectives
After the lesson, you should be able to:
- Distinguish the complete designation from an elementary symbol.
- Recognise its main information groups.
- Explain why the applicable system must be established.
- Review an introductory documentation package.
- Separate confirmed information from unresolved questions.
- Write a specific clarification request.
This is the first lesson. There is no prerequisite Academy lesson.
Technical foundation
Start with the anchor’s comparison
The board’s two examples communicate the same intended side through different notation.
This is why recognising the triangular elementary symbol alone is insufficient. The system determines how its placement is interpreted.
A drawing used in Europe does not automatically use system A. A single reference line does not establish AWS.
Check the declared standard, notes and project documentation. WELD-02 develops the side-location rules.
Why symbols are used
Symbolic representation helps organise requirements without drawing every weld as a realistic section.
Read the designation as structured information. Its meaning depends on its elements and the convention used to arrange them.
What information can be communicated?
Depending on the designation and associated documents, requirements may concern geometry, manufacture, quality or testing.
Some information appears locally; other requirements may be collected in notes or referenced instructions. Do not assume every requirement must be repeated beside every weld.
Recognise the components
| Component | Initial reading task |
|---|---|
| Arrow line | Find the indicated joint. |
| Reference line | Locate the organised symbolic information. |
| Elementary symbol | Identify the indicated weld type or preparation. |
| Dimensional entries | Find the specified numerical requirements. |
| Supplementary indications | Recognise additional information to interpret. |
| Tail, when present | Check complementary information or references. |
Do not confuse the complete welding symbol with one elementary sign.
Formal terminology reference:
https://www.iso.org/obp/ui?_escaped_fragment_=iso%3Astd%3Aiso%3A2553%3Aed-5%3Av2%3Aen
Connect the documents
Review the designation together with relevant views, notes and referenced instructions.
A WPS is a welding procedure specification. It supports execution within the production documentation. It does not remove the need to understand the drawing.
A welder qualification, a WPS and welding procedure qualification are separate subjects. This lesson does not establish qualification scope.
If information appears missing, check the surrounding documents before concluding that no requirement exists. If a conflict remains, use the workplace clarification process.
The review method below is teaching guidance, not a sequence prescribed by ISO 2553.
Information map — not a document-precedence hierarchy.
- Drawing identification and revision
- Relevant views and joint
- Welding designation
- General and local notes
- Referenced WPS and work instructions
Technical terminology
| English | Polish | Working explanation |
|---|---|---|
| Welding symbol | Oznaczenie spawalnicze | Complete symbolic designation. |
| Elementary symbol | Symbol elementarny | One component indicating type or preparation. |
| Arrow line | Linia strzałkowa | Link to the relevant joint. |
| Reference line | Linia odniesienia | Organises symbolic information. |
| Tail | Ogon oznaczenia | Carries complementary information. |
| Joint | Złącze | Connection between components. |
| Weld | Spoina | The weld, distinguished from the overall joint arrangement. |
| Drawing revision | Rewizja rysunku | Identified document version. |
| WPS | Instrukcja technologiczna spawania | Welding Procedure Specification. |
These are introductory working explanations. Check formal definitions when interpreting specialised cases.
Step-by-step review
- Confirm drawing number, component, revision and suitability for the task.
- Read the title block, notes, units and references.
- Establish the applicable standard and symbol system.
- Follow the arrow and compare views to locate the joint.
- Identify the information groups in the designation.
- Access the required supporting instructions.
- Record what is confirmed, what needs interpretation and what needs clarification.
- Resolve questions before carrying out the affected operation.
Follow your workplace document-control and production procedures.
Worked example — VL-204
Training package:
- Job order: VL-204, revision D.
- Print: VL-204, revision C.
- Cropped photograph of a welding designation.
- Referenced WPS VL-W17 is unavailable.
Reasoning:
- The component identifiers match.
- The revisions do not match; the appropriate version remains unresolved.
- The photograph does not show the complete drawing context.
- The referenced procedure cannot be reviewed.
- Familiarity with an earlier job does not resolve these issues.
A useful request:
“For VL-204, the job order specifies revision D, but the print shows C. The photograph is incomplete and I cannot access WPS VL-W17. Please confirm the appropriate drawing and provide the required instruction before I prepare the affected joint.”
Original VIA-LABORA training example.
- Job order VL-204 / Revision D
- Drawing VL-204 / Revision C
- Photograph: incomplete drawing context
- WPS VL-W17: unavailable in the training package
Further workshop examples
The customer drawing
A single reference line appears on a drawing supplied to a European workshop.
Check the declared system. Do not identify AWS from that feature alone.
The apparently missing value
A requirement is not beside the symbol.
Check local notes, general notes and references. If unresolved, clarify it rather than choosing a value from a similar job.
Common mistakes
- Reading one recognisable sign and stopping.
- Using an outdated or unconfirmed revision.
- Assuming geography identifies the system.
- Working from a cropped image without context.
- Ignoring general notes.
- Treating previous-job memory as current authorisation.
- Inventing unresolved requirements.
Try it yourself
A training package contains:
- Matching component numbers.
- A readable drawing with a revision that matches the job order.
- A symbol system you have not identified.
- A general note referring to an instruction you have not opened.
Answer:
- What is confirmed?
- What remains to be checked?
- Does a matching revision complete the review?
- Write one specific question.
Show suggested answer
Document identity and revision match. The applicable system and referenced instruction still need review. A matching revision does not establish that all requirements have been understood.
Example question:
“Which symbol system applies to this drawing, and where can I access the instruction referenced by note 4?”
Knowledge check
1. A single reference line proves AWS. True or false?
Show answer
False. Establish the governing system from the documentation.
2. The opening examples use different notation. Must they indicate different physical sides?
Show answer
No. They illustrate the same arrow-side weld.
3. A requirement is not beside the symbol. What next?
Show answer
Check notes, views and references before concluding it is missing.
4. Drawing and job-order revisions differ, but the component looks familiar. What next?
Show answer
Confirm the appropriate version through the workplace process.
5. Which is more useful: “The drawing is confusing” or a question naming the drawing, detail and unresolved issue?
Show answer
The specific question helps the responsible person resolve the issue.
6. Does completing this lesson establish your welder qualification scope?
Show answer
No. Training knowledge and qualification coverage are separate.
Use it in a technical interview
Support “I read drawings” with a real example.
Describe what you checked, which documents you used and how you resolved an unclear requirement. State honestly what you can interpret independently.
Useful wording:
“I confirm the drawing and revision, establish the convention, locate the joint and review the complete instruction. I raise specific questions when information remains unresolved.”
Use it with your team
Run a five-minute discussion using an approved training drawing.
Ask one person to identify the document, another to locate notes and a third to explain which questions remain open.
Agree how to raise a clarification request in your workplace.
Use authorised, non-confidential training material. The discussion does not authorise changes to production requirements.
Key takeaways
- Check the system before interpreting placement.
- Read the complete designation and its context.
- Confirm the document and relevant joint.
- Separate evidence from assumptions.
- Ask specific questions.
Practical bonus — Drawing Review Check Card
☐ Correct component and drawing.
☐ Appropriate revision.
☐ Complete, readable views.
☐ Notes, units and references reviewed.
☐ Applicable system established.
☐ Joint located.
☐ Information groups recognised.
☐ Required instructions available.
☐ Questions recorded and raised.
Drawing: __________
Revision/detail: __________
Confirmed information: __________
Question to clarify: __________
Use alongside workplace procedures.
WELD-01 · 2026-11-06 · via-labora.com/academy/welding/weld-01-how-to-read-welding-symbols/
Continue learning
Start of series: Welding learning path.
Next:
WELD-02 — Reference Line, Arrow & Weld Location.
Next, develop the detailed rules for locating a weld through arrows and reference lines.
Start of series · WELD-02 — Reference Line, Arrow & Weld Location
For candidates
Describe your drawing experience alongside processes, materials, positions, fabrication tasks and qualifications.
Contact VIA-LABORA about welding opportunities and the Technical Talent Pool:
technicals@via-labora.com
WhatsApp: +48 504 016 136
No specific vacancy is asserted by this lesson.
For employers
Discuss candidate preselection using the actual role requirements: processes, materials, positions, thickness or diameter range, drawing competence, WPS experience, certificates and fabrication work.
marcin.ciupka@via-labora.com
References and scope
ISO 2553:
https://www.iso.org/standard/72740.html
ISO public terminology:
https://www.iso.org/obp/ui?_escaped_fragment_=iso%3Astd%3Aiso%3A2553%3Aed-5%3Av2%3Aen
Editorial check: 6 November 2026.
The catalogue lists ISO 2553:2019, corrected 2021-09, as published, with a replacement draft under development. Use the edition required by the project.